Monday, May 30, 2011

Custard Pie

another post that i can not take full credit for...southernplate.com is where i got this recipe...i was having a sweet tooth!! i've never made a crust like this before...everything is mixed right in the pie pan...and i like that!

the crust...


Mix In Pan Pie Crust

1 1/2 Cup Flour
1 1/2 teaspoons Sugar
1 teaspoons Salt
1/2 Cup Cooking Oil
2 Tablespoon milk


Mix flour, salt, and sugar in pie pan. Slowly add milk and oil. Mix well with a fork and pat out to fit pan. Bake at 350 until brown, usually about ten minutes. 

cream the sugar and eggs 1st...

Buttermilk Pie

  • Unbaked 9 inch pie shell (or make your own with this recipe)
  • 1/2 Cup butter or margarine, softened
  • 1 1/2 Cups sugar
  • 3 Tablespoons all purpose flour
  • 3 eggs
  • 1 Cup buttermilk
  • 1 Tablespoon lemon juice
  • 1 Tablespoon vanilla
  • Cinnamon for sprinkling over the top, if desired
In mixing bowl, cream sugar and butter together until light and fluffy. Add in all remaining ingredients. Sprinkle cinnamon over the top, if desired. Bake at 350 for forty minutes. Let cool and store in refrigerator.

The end result

as you can see in the recipe it says "buttermilk pie"...i couldn't tell the kids that...they wouldn't try it ;)

Sunday, May 29, 2011

New Door Wreath

I bought this grape vine wreath at Hobby Lobby about 2 months ago...I put some flowers on it but I didn't "love" it...it's been hanging on my door...Last night I decided to get out the spray paint!! I painted it white...


In my kitchen...the light's not that great...i painted it white

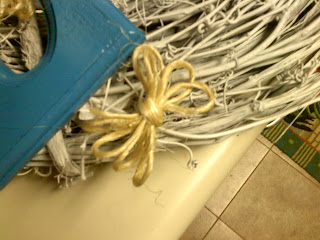
The flowers I used were bought at Dollar Tree....For some reason when i saw them the yellow just popped out at me...i just cut them off at the stem....they were originally long stemmed...i bunched them up and wrapped sisal twine around them....i hot glued the end to stay...i took the whole bunch and hot glued it onto the wreath....i had a letter "L" that i had also purchased at Hobby Lobby to use on another project that my husband hated...i had spray painted it blue from the flower pot project i did a while back...i also hot glued it onto the wreath...it just seemed to be missing something...i took some of the sisal twine and made some small flowers out of it....see below:


i made 3 of the flowers...i hot glued them onto the wreath and still something seemed to be missing....i rummaged through some of my old crafting stuff and found some little blingy jewels...i put them in the center to complete it...

hanging on door...
close up...

i'm happy with it for now...since i'm usually a copy cat, i just wanted to say that i came up with this on my own!! HAHA...just a creative streak in me today...i will probably change it up later....

EDIT 1: All of my stuff fell off! guess it was too hot on my door...got to try something different...

EDIT 2:  I used some Gorilla glue this time and it didn't fall off...has been several days!! YAY!

I'm linkin' up to debbiedoos newbie party!! my 1st one :) click on the link below to check out her site....

Debbie Doos :)


Peace, Love, & Joy

Tuesday, May 24, 2011

EAT

I started this project several months ago and put it in a box...I didn't like where it was going...Typical of me I think...

I have been seeing this on everybody's blogs so of course I wanted to try it...I purchased the letters at Michaels...I read online how someone used silver paint to get a stainless steel look...First I spray painted the letters black....I then put a few coats of the silver paint on them...That's when they got put in the box...

Spray paint on the table...Look! It spells eat...

I got to thinking...I have got to do something with those letters...I dug them out and added some more silver...

Not what I was hoping for...
A few more coats...Looks a little better I guess...
So for the final reveal...Still not the look I'm looking for....For some reason I'm really loving red...hhhhmmmm....

Above my laundry room door in kitchen...
Maybe its the fact that I'm using a crummy cell phone camera...Everybody always has better pictures but I'm too lazy to do all that...If the family likes it I will keep it there for a while...RED...sounds so much better....

Monday, May 23, 2011

Slow Day

I started a new project today but I'm not quite finished...It's not really turning out like I had planned...I was really excited to be posting it today but since it's not done I will be posting something else...Some more pictures of my flowers...I know, kinda boring...

Jeff hates the blue ball...he hid it in the bushes one time
 I started with a plan here...I really did...It was supposed to be one of those sterile front yards that have nothing but bushes that are low maintenance...I planted the dwarf nandina and a few other shrubs...Through the years I kept adding plants here and there...
Just a view from end of house...

I have a love for plants...All kinds...I know my yard does not come close to some of the other bloggers I read about but it means alot to me...I grew up in this house...I moved back here in 1998 and for the last almost 13 years I have given it alot of TLC...Lots of hard work and sweat has gone into my planting...I'm not crazy about the timbers around my bed, but my son made it for me so for the time being I'll be keeping it...He was about 12 when he did it...Now he is about to turn 19...It's funny how some things can be so sentimental....

Saturday, May 21, 2011

Yard Sale Day

Got up so early today...I missed having my extra sleep...it's about 9:30 and I've only made $38... But, I'm sharing space with my Mom and daughters....This is alot of work!! Not much to post today...Hopefully I'll come up with something more interesting soon....


EDIT : Overall I did pretty good...I made about $90...Not too bad for someone hauling away my junk!!

Friday, May 20, 2011

Always Something

We are starting off our Friday like this....


We are having problems with our septic tank...Today they started digging up our yard...

To be continued....................


This is our yard after the hole got covered...Septic tank is done...now to rake it out smooth

Thursday, May 19, 2011

Soap dispenser

Today I finally did my project that I have been waiting on...I have to give all the credit to http://www.houseofhepworths.com

I found this project several months ago and have been dying to make it! It was still cold here and windy and because I would be using spray paint I had to wait...and wait...So here it is:


Photo 1: The picture that I forgot to take when I started...This is what I started with...Just a regular bottle of Dawn Dishwashing detergent...The foaming kind...I must mention that I got it for .99 with a coupon...

Photo 2:  I took the bottle apart...Poured out the detergent..


Photo 3: Goo Gone...One of the best products ever made...When peeling off the label this comes in handy...It will remove all of the sticky...They sell this at my local Dollar Tree!!

Photo 4:  This is the fun part...I LOVE spray paint....The small pieces have to sit on something in order to get paint on all sides...Plus it keeps from getting stuck to the table...I used a bronze paint that I already had...It has to be for plastic...I used Rustoleum...Krylon makes it too and I like the nozel on it better...Is that what you call it? Where the paint comes out...It has a spring in it and sprays evenly...I thought about black but almost everything in my kitchen is black...And since I already had it makes it better...

Photo 5: Here it is...I am done with the painting...I couldn't wait to post!! I wanted to wait til I got my initial on it before I posted it but I'm like a little kid at Christmas...


I will be out and about looking for that initial tomorrow....Maybe the hubby will see this post...They make this little machine that pops various vinyl objects and letters out of it...It would be so perfect for all my craft projects....Here is a link www.cricut.com


or here is another...www.silhouetteamerica.com

Peace, Love, &  Joy

Wednesday, May 18, 2011

3 Tiered Pot

First of all, this is not my idea...I have to give total credit to Amy over at http://www.positivelysplendid.com/. When I saw this project I had to have it...I did this back in March so I don't have alot of photos...I don't even have the "during" pictures...This was before my blog...I'm trying to add some of my old stuff into some of my new things so some of my posts may just have 1 or 2 photos...


 When I decided to make this project, I didn't have any of the pots on hand nor did I have the resources to get them free...I used clay ones and it was rather costly..I felt bad for days because I thought I spent too much...But I'm happy with it...

I used a bunch of old plastic in my pots as fillers...I had some butter cups, mismatched plastic container, a couple of bottles...I put all of that in the bottom of the pots...On top of that I added Miracle Grow potting soil with the moisture control in it..I also splurged on this because I have alot of gardening experience and in the past my pots seemed to dry out too much....It has really made a difference...I don't have to water as much and the plants are thriving....

I picked basically the same colors as Amy used...That's what caught my eye! I got my spray paint at Lowe's because it's the only place around here that I could find the turquoise color...I also splurged on the paint too...It almost killed me to spend over $1.00 for a can of paint...I think I bought 2 of the turquoise and 2 of the red...I had some left over but I have already used some of it for other projects...On the inside of the pots I sealed them just like she said to do...

Amy's pots have numbers on them...I wanted to do that too but still haven't...Everybody that has seen my pots say they like it the way it is...After my stenciled door, I'm not sure that I will attempt the pots...I don't want to mess them up!! 

Now on to the most important part...The plants!! Everything in these pots came out of my yard...Except, the green vine stuff on the bottom pot...I saved on expenses by doing this...I wasn't sure how some of the ground cover would do in a pot but what did I have to lose? I already had it...

I want to thank Amy for coming up with this idea or at least sharing it...It is my favorite project I have done...

Tuesday, May 17, 2011

Random Flower Pics...

Last Sunday I took some pictures of plants in my yard that are blooming...Just wanted to post some of them for people to see....

This lambs ear plant has to be one of my favorite plants...I love the hot pink blooms..My mom brought me these plants when they bought their mountain house in north Georgia...I now have them growing all over the yard...Once the seeds fall they multiply like rabbits...They are also hardy in the winter...No blooms but still stay the white greenish color...  


I received this rooster planter one year for my birthday...I liked it but didn't love it...I had an idea while trying to take a nap...Maybe a little spray paint?? So i painted the bottom pot which was the original...Its a hammered look bronze...I cleaned out my fish pond and found the small pot...A little red paint and presto...It didn't cost me anything...I already had everything I needed...Even the petunias...Had them leftover from planting...

This plant is insane...See the 2 stalks? Last year it had 1 and it got taller than me...Its some sort of Lambs Ear I guess...I really like it..AND it had babies...They are everywhere....

The purple petunia is the reason I took this photo...They remind me of my childhood...I spent alot of time at my grandmothers house and she had these flowers...The yellow daylily happens to be one of my favs too...I call it the mini daylily because its so much smaller than the regular ones...I have no idea what the real name is...

Project of the day...May 17, 2011-Door Stencil

This project started a few months ago in my head...I saw on several blogs I follow that people were painting their house numbers on the front door...I so wanted this!! This project cost me nothing...BUT a headache...

Maybe its just me...I seem to have problems with the projects I start...I read and read and read on how to do something...When I decide to attempt it, it messes up...Yes, I messed this one up too...The outcome is nothing like I expected...For right now I'm leaving it...I want to see what everyone says before I paint over it...

In photo 1: This shows the door with the stencil applied...I printed off letters on the computer of the font I liked...I then traced it onto clear contact paper...This is the contact paper stuck to the door...
So excited  at this point!!

Photo 2:  I took a stencil sponge brush and lightly tapped on the paint...It didn't work...
Waiting is the hardest part
Photo 3: I took the stencil off and the paint bled through...I smoothed the stencil out before I applied the paint...This worked on other peoples blogs...why me?!?!

ugh...why me

Photo 4: I took a very SMALL brush...I painted around the numbers and letters with red...I used a hairdryer because I'm in a hurry today...After the red dried I painted the white...The lines are not very crisp....I should have bought some vinyl but the door gets extremely hot in the summer....Direct west sun when it's setting...plus this was free!!

One thing for sure...I'm not a very good painter
 Photo 5: TA DA!! So here is the result....It's ok....

Where are my glasses?
So as it turns out, it's barely visible!! But, I think it's quite cute...


Peace, Love, & Joy


Don't try this at home

Awhile back I was wandering through Home Depot and came across an endcap of clearance items...One of the items was a box of liquid stainless steel paint...My mind started ticking...Since I had a white refrigerator and all black appliances, I figured I could throw a little paint on it and everything would match just fine...I had researched several ways of painting appliances but this was not one of them...It seemed perfect for me!!
I think this was on an infomercial
 I had also found a site that sold sheets of "faux" stainless steel sheets...This stuff is all over the web...It seemed like a good idea but I felt like I might mess it up...Like I wouldn't mess up the paint...LOL
Beautiful..."faux"
So, with much anticipation, I got to work...I did everything that the instructions said...Don't try this at home...If there is one thing that I will never do again, this was it...If i learned a lesson in life...This was it...I lived with this for a few years...Hoping my frig would break so I could just get a new one...It never happened and a new project took place...
Husband said this is the ugliest thing he ever saw
This picture is from when I was in the middle of stripping this mess off! What a job...Like I said, lesson learned...Next time I'll keep the white...
Here is my finished project....I used oil based primer and paint on the metal parts...On the plastic pieces like the handles, Krylon plastic spray paint...I did make a mistake on the handles...The day that I painted them I also put them back on...This was last summer and I was not vary familiar with how paint cures...I'm not sure about the plastic but on a regular piece of furniture it takes about 28 days...I had to take the handles off and re-do them...It was a mess...I think from greasy hands touching it...I used a little sand paper to scuff it up a little...I then painted a coat every couple of days until I had the coverage I wanted..So far its holding up much better...The only thing I hate about this is the little bit of white that is showing where you get water and ice out...I'm sure I could try it but with so many hands touching the buttons I just didn't think it would hold up...I can live with it....This picture is not that great but I've had alot of great feedback on how it looks...Now I hope my frig doesn't go out...

Peace, Love, & Joy

Monday, May 16, 2011

Cloche....Everybody is doing it

Cheese Dome...


I know...I know...Everybody is doing it...Making the "cloche"...I had to try it...So easy and so cute!! I bought the top part, which is a cheese dome,  at the Goodwill...I already had the bottom, which is a candle holder that came from Dollar Tree...I glued the 2 pieces together with some Gorilla Glue and then painted with some Krylon plastic spray paint...It was too plain for me so I picked up some moss and a little bird at the local Hobby Lobby and stuffed it inside...I'm not certain on the total price of this project since I already had some of the stuff..I would say it was less than $5...I didn't take any before pics since I'm new to the world of blogging...At least about stuff I have made...I will work on the pictures in the future :)

Peace, Love, & Joy