Saturday, December 24, 2011

Picture Frames....

if you are my family, quit reading this...your presents are on this post...i got this idea from megan at Miss Madison's Charmed Life ... thank you very much for helping me come up with these last minute gifts...we, meaning the husband and i, cut and made these frames...he has decided he wants to get in on the action...he did the actual cutting and i painted and mod podged...they turned out great...


tried to keep everything matching with black..


this one i made out of a scrap of wood for baleighs room...she likes houndstooth...


Linking Up To:


Help, I'm Addicted To Pinterest......

seriously, look below to see what i've turned into...my house needs to be cleaned...but, look at my table...what table??? i can't even see it cause i have so much project junk on it...its almost christmas and i'm still making stuff!!


so, when jeff sees this, he will go out of his mind! and my poor puppy...look at her...she needs to be saved!!


Family Date Art

just wanted to share a project i just made...wanted to make something new for my room...so excited to do this since it was on my to do list....

Monday, December 19, 2011

Faux Mantel

i've had a lot going on...working on so many things...this project means so much to me...i have learned alot about measuring, cutting, and using power tools...for several months i have researched faux mantles and how to build them...for me the challenge was to use what i had on hand...i didn't want to spend a dime on this project...i did fail at that part...but for the money i spent i'm very happy with the outcome...

the "fantle"
i started documenting the process with pictures when i first started...since i had a little bit of a struggle with this project, i decided to not take pics for this one...my inspiration came from Vintage Revivals and from Heart Break Kids. you can click on the link to see how they made theirs...i had 2 sets of bifold doors in my barn..i never started with a certain measurement...i knew i wanted my mantle to be a little taller than some of the ones i had seen online...i cut my doors so that the longest portion was the part i was using...i wanted solid ones but you know me, i had to use what i had...the hardest part of this whole project was to decide if i wanted it to be flush with the wall or to sit out a little bit...i chose for it to sit out...the reason for this is because i didn't attach it to the wall at all...i can move it around if i want to put in on another wall...i cut 2 pieces of wood the same length as the doors...i attached them together with "L" brackets...my husband was shocked that i knew what that was...for real, i have internet...the piece of wood in the center is a scrap from an old shelf...i attached it between both doors...the closet doors were painted black...i put on a coat of white paint...i didn't feel it...i then distressed...more my style i think...for the top, i had to spend money...ugh..i had a piece of wood that was the right length, but, it wasn't wide enough for my liking...i wanted to be able to decorate...i had a few things that i knew might not fit with a narrow piece on there...i spent $9.72 for the top...i then stained it with a very dark mahogany mixed with some dark walnut...it looks almost black...the look that i wanted since i have lots of black furniture...i am not totally finished yet...i have a few other things i want to do but i did manage to get it done in time to hang some stockings...that was my goal...after christmas i will be working on it some more...

i wanted to add this...this room is my living room...it was once a car port...i had a wall put up to enclose it...the floor is raised up with a hard wood floor on top...we think that cold air gets trapped in that space in between...on very cold days its hard to heat the room...i bought the little heater just for this project...we really like the way it looks...it has 2 settings that are for heat and just for the light...its really cute...looks like a  burning fire!

thanks for taking the time to read about this project that i waited so long to get completed...i feel like i truly accomplished something this time...


Linking Up To:
Tipjunkie
Kammys Korner
Not Just A Housewife
Primitive And Proper
Creations By Kara
Someday Crafts
Fireflies and Jellybeans
HOH
Primp
Savvy Southern Style

Anthro Knock Off

when i first saw these around on the internet, i HAD to have one...mine is a little different from the original...i wanted one made from a mason jar but i didn't have any...i looked at the ones at hobby lobby...nope, too much for me...i've been saving spaghetti jars for various projects...the small jar i had was from some grated cheese...i also was out of silver paint so i had to do the lids in white...i also added some twine around the neck of the jar...for the inside i used some table salt and some kosher salt mixed together...the trees are from hobby lobby...they were $1.99...for the large jars i used a small piece of wood hot glued to the lid for the tree to sit on...i wanted the tree to be raised up so there would not be so much empty space at the top...so for a total of $1.99 for all of these, i'm pretty happy!! i had all of the supplies already...


one last thing...i went to anthropologie.com to look up these snow globes...they no longer have them...the original price was $38 and they were marked down to $26...maybe thats why they are out...they were so CHEAP!!!!


Linking Up To:
Ask Anna
Between Naps On The Porch
Chef In Training
Sugar Bee Crafts
A Creative Princess
The 36th Avenue
Tip Junkie
Beyond The Picket Fence


Sunday, December 18, 2011

Christmas Crafts

i wanted to make some quickie things for teacher gifts...they turned out to be not so quickie but still turned out ok...the kids enjoyed painting...if they are happy then mama is happy....


made for mrs. bosworth...baleighs favorite teacher...used purple because the knights colors are purple and black...added hounds tooth ribbon for black and because we had it already...i dumpster dived the wood...LOL...already had vinyl and paint...cost to make $0...gotta love that

made for hannah maries teacher...didn't know what to do...i suck at cutting vinyl and the original plan bombed...i also dumpster dived this wood...i already had the other supplies too...hannah had a great time painting this...even though she is not a painter and glooped it on...she tries...another free project....
so now that i can successfully use a power tool, i am working on a few other things...i will post more pics when i get done with the snowman we are working on...


Saturday, December 17, 2011

Dresser Before & After

i just wanted to share a little change i made in my dresser that i use in my dining room....i added some glass knobs to replace the wooden ones...they were on sale at hobby lobby for 1/2 off...originally 3.99...


before

after
still thinking about painting it...but for right now i like it alot better!


Linking Up To:
Flamingo Toes
I Heart Naptime

Friday, December 9, 2011

"New" Entertainment Center

i'm now posting the longest project in history...it took me days to paint this entertainment center...for almost 3 years i've been trying to decide what to do with it...it was originally bought for a 54" projection screen tv. when jeff and i got married we moved the tv out and put in his flat screen...we used a sofa table to sit it on until i bought the dresser and turned it into a tv console...i'm obsessing over white right now...it really brightens up the room...its kinda hard to get used to looking at it...its just straight gloss white right now...no distressing or glazing...

this is the dresser turned tv console...the left is when i bought it...the right is after i painted the top black and added some glaze...i also painted the knobs


so dark...my flash was on too!

here it is finished...a few santas until after christmas...


Linking Up To:
Kammy's Korner
Primitive & Proper
Savvy Southern Style
A Creative Princess
Fireflies and Jellybeans
HOH
French Country Cottage
Flamingo Toes
I Heart Naptime
The Shabby Creek Cottage
Domestically Speaking

Tuesday, November 22, 2011

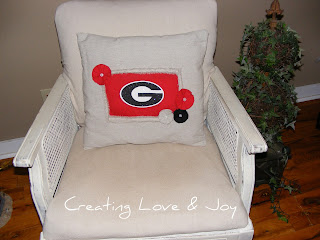
Georgia Pillow

like i said on my last post, i can't stop sewing!! i keep thinking i'll run out of ideas....since i live in GA, UGA is very popular here...my husband also loves the georgia bulldogs...we have so much football stuff in our house...and i could careless about it!! i'm hoping that someone will see my pillows and be interested...i had fun on this one...i tried something new this time...i created a stencil and painted the G on the fabric...it was so easy!! i used a flat brush...the paint didn't even bleed out of the lines...i originally started with the color graphite but my pen parks could still be seen...i know, i should have used something else but it was my first time...i then painted on the black...covered perfectly...i thought this one might be for the person that didn't want alot of color but still wanted to show they were a fan...i am positive that people don't like red as much as i do...

another thing that i am now doing is putting my name on my pictures...or at least the ones that i know are original...all of my pillows have been my own creations...and yes, i can be a copy cat...but only on the fabulous stuff and i give credit where its due...leave me a comment!! let me know what you think

Creating Love & Joy

Monday, November 21, 2011

Pillow #2

once i get started sewing, i don't want to stop..ideas are flooding my head...so many ideas and not enough time!! i had another shirt to yard sale but decided to use it for my next pillow...i cut up the shirt...made some flowers out of it...sewed the G onto the fabric and stuffed...this one ended up being a little skinnier than the other one...the stuffing was different and it made it kinda lumpy so i took some out...


i would love to have comments on both of my pillows...if you like them let me know...

Creating Love & Joy
Ashley

Linking Up To:

Saturday, November 19, 2011

Pillow

just a quick post to say i didn't go crazy trying to make this pillow...the actual designing part is what was getting to me, not the sewing...the G is from a destructed tank top that i was going to sell online but had a stain on it...i'm kinda glad now that it did...makes for a nice one of a kind pillow!! the trim is a seam that i took apart on the drop cloth that i used to make the pillow with...stuffing was from a pillow off my couch...total cost was $0 since i had everything on hand...


Peace, Love, & Joy

Wednesday, November 16, 2011

More Vinyl

what a rainy day its been in GA today...i have a handle that needs  to be spray painted in order to  finish one of my projects..its a sewing machine cabinet and i'm super excited about it!! i'll be posting about it soon...as i was loading the dishwasher i noticed that i'm almost out of detergent...i've been making my own since summer...found the recipe on another site...i believe it was tipnut....


the recipe:
1 cup of borax
1 cup washing soda
1/2 cup of kosher salt
15 packs unsweetened lemonade koolaid 
vinegar for rinse cycle
use 1 tablespoon per wash


i've read what seems like a thousand recipes...for me this works..i have very hard well water...also, my dishwasher stinks...not in a smelly way, but a mechanical way...its very old too...i have to pre-rinse everything that i wash...

take all your ingredients and mix together...

i decided to make a label to go on my container...for the last 2 years we have had to adjust how we live..less money means less things you can buy...one of the reasons i make my own detergent...i also would love to have a nice glass container to put it in but i already have a container that i'm using...for right now i will remain frugal and thrifty...

nothing fancy here...a vintage tupperware container and a scrap of vinyl....cost of this project was $0...i even had all the ingredients for the detergent...


Peace, Love, & Joy


Thursday, November 3, 2011

Cat & Dog Food Containers

just 2 little projects that i worked on today...i wanted to share...


i made this for tom the cat...i got the cat print from the silhouette website....i chose a solid one because they are easier for me to work with since i'm new to all of this vinyl stuff...


i also got the schnauzer print from silhouette...even though maddie looks nothing like that right now...she is such a wooly booger...LOL...

like i said before, i'm gonna get this...i love my silhouette and i learn something new almost every time i use it...trying to get some of my little projects done before i move on to my crafty things...had someone inquire about buying some vinyl...its funny how the little things in life can make you so happy...i really love making things...i'm right where i need to be!!

Peace, Love, & Joy


Tuesday, November 1, 2011

Another Decal

finally!!! i made my new car decal...i have had this idea in my head but i had to figure out how to do it...even though i figured it out, i still messed it up...but, its ok...i know what to do next time...i still put it on my car...i have come to the conclusion that it can be trial and error...

here it is! i'm not letting this silhouette kick my butt!!


Peace, Love, & Joy

Monday, October 31, 2011

Mirror

i was so excited to get this mirror...i got it free from jeffs grandmother....of course i knew the gold would have to go...i have been looking for a nice decorative one but this one is plain....the key word here is free....i even had all of the other supplies i needed....

here is the before....very nice gold mirror

notice the red on the side? my plan was to paint it red...i got almost done and ran out of red paint...oops...i just grabbed some white and sprayed over it...something made it bubble up...i was using krylon for any surface...i usually don't have a problem with it...just sanded it some and painted it again...

i had a picture of the mirror part but i lost it along the way...i took the mirror out of the frame...i first tried some oven cleaner to strip off the back...it didn't work...i then took some spray on paint stripper and a razor blade to scrape off the mirror film...it took a quite a bit of effort to get it off....i've been reading that some people are having luck with just the oven cleaner...

here is the after....i did this mirror to hang on my gallery wall...if you look close you can see the places on the mirror where it was stripped....i didn't use any fabric on the back...the back of the mirror that holds it in is white...i just decided to let that show through....i'm ok with it for now...i still will be on the look out for a nice decorative one...it works fine with the way i have the wall decorated...

Peace, Love, & Joy

Thursday, October 27, 2011

Knife Block

just a quick post to share what i did today....i first found this project over at House Of Hepworths...since i had a knife block already i decided to give it a try....

i painted it black...sanded the edges a little

added some vinyl from my silhouette...i'm just learning how to use it...

Peace, Love, & Joy

Monday, October 24, 2011

Gallery Wall

i had a vision in my head that i could not describe...if i tell jeff what i'm thinking he gives me the "you're crazy" look...i tried to tell him what i wanted to do with the long wall in the living room.. i'm not quite sure he agreed with my plan...the first look came when i brought the $2.00 antlers home from the thrift store...

i painted this wall red several years ago...i wanted an accent wall to go with my rooster decor...i got rid of alot of my rooster decor because it was getting a little out of hand....this is after i had moved a few things...i always start on the bottom of the wall and move up...i had several holes to patch...

here is another view...i wanted to keep some of my georgia things but work in some new decor too...sshhh...i know some of this stuff is tacky...jeff hung it up...

here it is all finished...my antlers...painted white....distressed and painted mirror....a few pics with extra frames....this is just a start...i may change it...but for the minute i love it!!!
thanks for the comments on my red table...now i know i made the right decision!!


Peace,  Love, & Joy


Chili Recipe

since i got married, i have been trying really hard to cook every night...i love trying new recipes...a few weeks ago i made some chili...i didn't use a recipe but i want to share how i made it...it was a total hit here...when they like something, i try to repeat it...we are having it again tonight but this time i am making a double batch...i will freeze whats left over for quick night dinners later...this is just a very basic recipe...

ashleys chili
1 pound ground beef
1 can rotel tomatoes 
2 cans diced tomatoes
1 diced onion
1 can chili beans with sauce
chili powder
garlic powder
salt and pepper
cumin

brown ground beef and drain....chop onion...i don't cook my onion with the beef because i don't like to lose the flavor when draining the grease off...i puree all of my tomatoes...we don't like chunkys here....i have made it without pureeing before but the kids were not that fond of it....chop to your liking...i don't have specifics on the spices...since i can't eat very spicy, i shake out some in my palm to start with..i would guess about 1 teaspoon for the chili powder, garlic powder, and cumin....after the chili cooks for a bit i go back and add more if needed...let it simmer for about 1 hour....

today i am using ground turkey...i also am using my crockpot...i estimate it to take about 5 hours on low to cook to my liking...we love having hot dogs with the chili...tator tots covered with chili and cheese are pretty yummy too!!


Peace, Love, & Joy

Saturday, October 22, 2011

Adventures In Soap Making

i saved a homemade soap recipe on pinterest that i have been wanting to try...i'm sure if you are reading this, you are probably saying, why can't she post something that nobody else does??? i see something and i want to try it...

the recipe that i found called for glycerin...i didn't have any of that on hand and was too cheap to buy any...this past week we have been cleaning out my husbands grandmothers house...in the medicine cabinet i found a whole bottle of glycerin....i immediately thought about my pin on the soap...

the original recipe was from savvy housekeeping. i read the whole post and then the comments...a large number of people were saying that the soap didn't turn out and that it was too runny...i've tried making it before and it was a failure...the following is my recipe and how it turned out...

the 1st thing to do is to grate the soap...you need 1 cup of grated soap..i've been saving soap from when it breaks...yeah, that sounds kinda weird i guess...to me it sounds thrifty...i used ivory soap...

after the soap is grated, add it to 5 cups of water...add 1 tablespoon of glycerin to the water...heat until all of the soap melts....

after the soap melted, i put the whole pot into the refrigerator....i read that a few people were letting the soap sit over night and then blending it to make it smooth...the soap was a big glob when i took it out...i used my ninja to process it...

its much smoother now...you can see the difference in the photos....it looks just like the ivory body wash that you can buy...

i filled an empty dispenser and this is what i have left over...don't be jealous over my mt dew bottle...i'm sure that it will settle some...i tried the pump and it came out just fine...hopefully it will not clump up after sitting in the jug...

so comparing the soap recipes i think that using half the amount of water made a difference...the original called for 10 cups and i only used 5 cups...when i made the homemade soap before, i can't remember how much water i used...i didn't blend it either...it was so clumpy that it wouldn't pump and i threw it out...

if the soap doesn't clump i will be making it again...its very cost effective....if you use coupons, ivory can be bought in a 3 pack for less than a $1.00...even if you buy bars of soap at the dollar tree that makes it cheaper than buying one pump soap...

i just wanted to share another copy cat recipe and what i thought about it...thanks for reading!!


Peace, Love, & Joy